I have gotten some questions on how I make the little 3D flowers for my cakes, like the ones on this cake:
And on this one:
So I figured I'd make a little step-by-step tutorial.
First an overview of the things you'll need:
Fondant, tylose powder, a flower-shaped cookie cutter, and a spoon. The pearl nonpareils are just for fun!
First, we add tylose powder to the fondant. This will essentially turn your fondant into gumpaste. What is the difference between gumpaste and fondant you say? Well, here's a clumsy explaination:
Fondant is a sugar paste. Gumpaste is a sugar paste with gum ingredient added, such as gum tragacanth or in this case, tylose. Because of the gum ingredient, it is a lot more stable, more elastic, can be rolled much thinner, and will dry much harder than fondant. The downside is, it won't taste as good. That's why you'll want to make little decorations out of gumpaste, but use fondant as your cake covering.
Just a little sprinkle of tylose is enough in these small pieces. On average you'll need about 3 teaspoons of tylose powder per lb of fondant, so that will give you a perspective of how little we need. If it turns too gummy on you, add some more fondant. If it gets too dry while you're working, add some glycerine, or if you're really in a pinch, some vegetable oil.
After we reach the right consistency, we roll out a thick (about 3 mm) sheet of the gumpaste, and easy-piecy use the cookie cutter to make some flowers. Don't be sad if the flowers look skinny and puny, we'll blow some life into them later.
Lift the flower gently with a butter knife or small spatula, and onto the surface of your choice. I like to use this foam from Wilton, but you can use a (clean!) sponge, a soft pile of (clean!) paper towels, a rubber place mat dusted with powdered sugar... whatever you have and feel comfortable with.
Now it's time to add some life to the flower. I like to use this tool from Wilton. There is a plethora of these tools out there, from different manufacturers, available at cake supply stores and hobby stores everywhere. If you don't want to dish out any extra cash, you can use whatever you can find around the house: the (clean!) backsode of a ballpoint pen, a tiny measuring spoon, even your little finger.
Lightly press the ball down on each leaf of the flower, and it will spring back up and make the flower come to life. Also, press down on the middle of the flower to make an indentation where the center will be.
Next, we'll get our 2nd color fondant ready. All we need is a tiny round-ish ball to fit the center of the flower.
I like to add a pinch of tylose to a few drops of water and use as a glue for the gumpaste. Just brush on a little right where we want the pieces to adhere, like this:
Then add the little center ball:
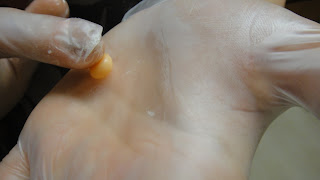
And give it a little poke with a gumpaste tool or a toothpick.
Next, to the trick that makes the flowers 3D : Drying them in a spoon. You can use a measuring spoon, a kitchen spoon, a shot class, an egg cup, anything you can find that is hollow and round. I usually scramble up anything I can find in the kitchen. My favorites are measuring spoons, but it's fun to use different things, as they will take on different shapes and angles.
You can leave them like this, or you can ad a little nonpareil just for cuteness' sake. Or dust it with a little edible glitter or disco dust.
In the end, you should have a gumpaste flower garden in your kitchen, which is sure to drive your significant other absolutely insane. ("I can't cook lunch with all these stupid little sugar things every-freakin-where!")
But that's ok, because when you can place a baby in the middle and make a scene like this, it's pretty satisfying.
Friday, June 24, 2011
Monday, June 20, 2011
Baby Shower cake: Ani
This is a simple little lemon -strawberry cake with strawberry buttercream filling and vanilla fondant. It's relatively small, feeds approximately 15 people.
Cupcakes: Minnie Mouse
These little cuties are Minnie Mouse- cupcakes. I just made the little gumpaste bows, the birthday girl's mommy made the pink cupcakes with white chocolate chip polkadots and mini-oreo ears. Cute, or what?
Thursday, June 16, 2011
Baby shower cake: Fernanda
This is a cake with tropical flavors, perfect for a spring baby shower. It consists of layers of pineapple, orange, lemon, passion fruit and banana cake, with banana, vanilla and lemon fillings, butter cream and melon-flavored fondant. Flavor wise, it's probably one of the most elaborate cakes I ever baked. This is one of my favorite cakes ever, even though the marbled fondant originally was a mistake. I mixed vanilla and melon fondant to make the flavor less intense, and had a hard time getting an even color. Then I realized that marbling would be really cute, so I stuck with it.
The baby , blocks and teddy bear are gumpaste, everything else fondant. Everything is, of course, edible.
Labels:
Baby Shower Cake,
birthday cake,
boy,
green,
vanilla fondant
Wednesday, June 15, 2011
Kid's birthday cake: Dominic (Backyardigans)
This is a kid's first birthday cake. Dominic loves the Backyardigans, so that's the cake he got! This was the first time I experimented with the floating stars, and I think it really makes the whole cake. The clouds were made by warping a flower-shaped cookie cutter (you take what you got!) The cake is white chocolate with strawberry glaze filling and vanilla cream.
Labels:
birthday,
birthday cake boy vanilla,
boy,
cake,
fondant
Birthday cake: Savannah
This is just a 10-minute cake I threw together as a freebie with a bigger cake. i had leftover cake and leftover pink and white fondant, and experimented with marbling. Turned out pretty cute, and so easy!
Sunday, June 12, 2011
Just-because cake: Jenny.
Feel-better-rainbow cake made to order. Strawberry cake with strawberry and buttercream filling and vanilla fondant airbrushed with food coloring. Now that was fun! (and messy...) The pot of gold is modeling chocolate, and the coins are gumpaste brushed with edible glitter.
Just for fun - here's a picture of the work in progress:
Labels:
fondant,
glitter,
gumpaste,
modeling chocolate,
Rainbow cake
Baby Shower cake : Brie
Brie's baby shower cake was so much fun to make! The only instructions I got was "just make it girly, and vanilla!" So I went all out with the pink and the hearts. The cake is French Vanilla with buttercream and white chocolate filling, with melon-flavored fondant.
This was a large cake, estimated to feed around 60 people.
Baby Shower Cake: Elisa
Elisa's baby shower cake was a simple, two-tier white chocolate cake with fruit and buttercream filling and melon-flavored fondant. The baby and the little flowers are gumpaste. This cake was made on fairly short notice, so the flowers are glued on with white buttercream instead of tylose gel. It leaves white marks if you're not careful, but is great in a pinch when you can't wait for the tylose gel to dry.
Labels:
Baby Shower Cake,
chocolate,
fondant,
girl,
gumpaste
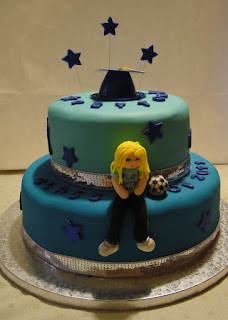
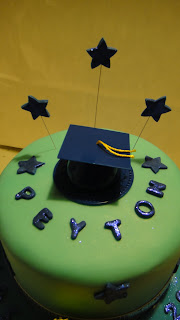
Graduation cake: Peyton
This is a cake made to order, for the graduation of a star soccer player.
The bottom tier is 2 layers of white chocolate cake with pineapple glaze filling and canilla fondant. The top tier is vanilla cake with tropical fruit filling, white buttercream and berry - flavored fondant.
I copied the little soccer player from a photo on the graduate's facebook (it's research, not stalking!) She is made from gumpaste, and is completely edible. This was my first time using disco dust, (glitter effect on the lettering and the stars) and I'm sorry to say it didn't photograph well. The glitter looked great in the light though.
Battle of the Brands: Pam VS Wilton
Welcome to the driest, most boring first post of a blog in the history of the Internet. There should have been clowns and trumpets andchampagne and cake with sprinkles somewhere here, but no. I chose grease. Wow.
This is the first edition of the Battle of the Brands.
Contender on the left: Wilton cake release, contender on the right: PAM Original cooking spray w/flour.
Both competitors used the same baking pan, same cake recipe, same cooking time, same temperature.
You should think the result would be pretty even?
Guess again.
Naughty Pam got very eager and sprayed not only the pan, but parts of the kitchen floor as well. Wilton looked a little goopy and weird, and needed to be applied with a brush. A little extra work, but not so much it would ruin your day completely.
The end result?
The Wilton cake came out with almost no air pockets, didn't stick a bit, even when the cake was still a little warm. It also didn't brown much on the edges. PAM did her best, poor thing, but ended up being... just OK. A few pieces stuck to the pan, the surface was somewhat uneven and the cake was brown around the edges.
The picture says it all - which cake would you rather have?
Subscribe to:
Posts (Atom)


